Saturday, 28 May 2011

Claypot Pig Liver Recaptured!

I literally grew up in the shadow of People’s Park Complex. It was a big shadow, because it was a mammoth of a building. You won’t miss it if you were in Singapore’s Chinatown.

In its heyday (the late 1960s) People’s Park Complex was a statement-making piece of architecture. Today it sticks out like a monolithic green-and-orange sore thumb at the foot of Pearl’s Hill.

Before People’s Park Complex was built, a market stood on this one-hectare plot of land. It was called People’s Market. I remember the maze of zinc-roofed hutches, which sold mostly textiles and household ware. There were also hawker stalls and open-air restaurants, all ringed by wire fencing with a couple of openings. It was filthy and smelly, but full of character and life.

I was six, and this place gave me with some of my earliest adventures in food. I remember a couple of stalls that were famous for things such as “Scissors Rice” (ie. a combination of pork chops, curry chicken and rice), Chinese desserts, and roast meats. There was a particular restaurant my family often brought me to. Its name slips my mind, but not its location next to a huge drain that ran between present-day Eu Tong Sen Street and New Bridge Road.

There were certain dishes that were de rigueur with each visit: Salt-baked Prawns (), Fried Spring Chicken (), Bitter Gourd with Pork Ribs (苦瓜焖排骨), Sweet Sour Pork Ribs (排骨王), and Claypot Pig Liver (砂煲猪润). Not only my family loved them; everybody did, because they were “in”. They were the Prawn Paste Chicken and Crab Noodle of their day! I came to learn that food, like clothes, could come and go.

Sadly, the market burnt down in 1966; and shortly after, People’s Park Complex rose on the same location. The shopping center quickly became very popular, and was a favorite gathering place for old folks living nearby because of its air-conditioned atrium. Even today, the sight of this building always brings a tide of memories.

I’ve loved pig liver since young, and ate it frequently in all its forms and cooking styles (of which I’ll share more in the future). My favorite style is Claypot Pig Liver. It was instant love when I first tasted this dish at the restaurant in People’s Market all those years ago, and I’ve measured all later encounters against this first meeting.

Claypot Pig Liver remained popular in Singapore until the late 1990s -- when people became conscious of calories and cholesterol. Though it still appears on restaurant menus, what’s served today seldom recaptures the former glory of this dish as I remember.


Claypot Pig Liver

Pig liver                                  200 g, sliced into 3-cm thick
Sesame oil                             ½ tbsp
Ginger                                    60 g, sliced into 1-mm thick, preferably “young” ginger (子姜)
Spring onion                        60 g, separate the white portion from the greens
Chinese wine (花雕酒)     1½  tbsp

Marinate:
Oil                                           1 tsp
Oyster sauce                       ½ tbsp
Soy sauce                             ½ tsp
Salt                                         ¼ tsp
Dark soy sauce                   ¼ tsp, optional
Chinese wine (花雕酒)    ½ tsp
White pepper                      a pinch
Caltrop starch (生粉)        1 tsp, mixed with ½ tbsp of water


Method:
1.     Place the pig liver flat on the cutting board. With the knife slanted at 60°, cut the pig liver into 3 mm-thick slices.
2.     Add oil to the pig liver and mix thoroughly. This step is important, as it prevents the pig liver from getting rough. Next, add oyster sauce, soy sauce, salt, Chinese wine, pepper, and mix well. Finally, add caltrop starch and marinate for 30 minutes.
3.     Heat claypot over high heat and add sesame oil. When the oil is heated to around 180°C, stir-fry ginger and spring onion (white part only) until both turn slightly golden brown.
4.     Add pig liver and quickly stir-fry for about 30 seconds; add the remaining spring onion. Trickle some Chinese wine onto the claypot rim. This ensures that the alcohol in the wine evaporates before reaching the liver, thus lessening the” bitterness” of the wine. Cover the pot with its lid and remove it from the flame.
5.     Pour 1 tbsp of Chinese wine around the circumference of the lid and let it brew for 3 minutes. The remaining heat from the claypot will continue to cook the liver.
6.     Remove the lid and quickly stir the food, and scoop it onto the serving plate.

Note:   Measure of success – the liver should be just cooked, and remain tender and succulent.
            Don’t over-marinate; the flavor of the liver should come through.
            The final drip of Chinese wine around the lid is to provide a “fragrance” when the lid is lifted.

Sunday, 22 May 2011

Steamed Tapioca Cake in War & Peace

I remember Grandma fondly. We spent a lot of time together.  I remember the stories she told me about World War II – of how it affected and changed my family’s destinies.

They were stories of tragedy and windfall; of opportunities thrown up by the vicissitudes of war; opportunities grasped or missed that led to fortune or disaster. Grandma was such a vivid raconteur that my ancestral family came to life in my mind as an album of living full-blooded persons, though I had never met any one of them.

The downside was, as a naive little kid, I became “indoctrinated” with the prejudices and stereotypes Grandma wove into her stories -- which I have struggled to dispel to this day. And though she would often ramble and repeat herself for the umpteenth time, each telling would bring a small, previously unknown, embellishment or fact to light. And a new layer of emotion or insight would be added. Through her simple words, Grandma made the war appear more real to me than all the books, movies, and documentaries, that I later had access to, ever did.

Maybe, it was from Grandma too, that I grew to love the romance of the War Years – from its furniture and interior designs to its music, cabaret life and clothing styles. And, for sure, too, Grandma’s stories made me “grow up”, by acquainting me with the seamier side of human nature – of life’s underbelly.

She often told of an uncle of mine who made his fortune peddling opium in Singapore during the war. It was said he made enough to fill large kerosene containers with jewelry, gold and cash. With war’s end, he left for China, taking along all his “earnings”, and became a landlord. When the Communists came to power, he had everything taken away, and became destitute. He took to writing letters home to Singapore pleading for help and money. But, recalling his departure for China without a cent or thought for those left behind, his family and relatives chose to ignore him, and left him to his fate. …And to think I belong to a family like that!

Grandma would also paint an interesting picture of the food that people ate during the war, of the types of ingredients available then, and of how they were obtained from the black market. I became all ears whenever Grandma got to the food part of her stories. And when I pestered her hard enough, she would even cook some of the dishes she talked about.

During the war, food was naturally scarce, so people made do with whatever they could lay their hands on. One of the staples was tapioca, as it was easy to grow and harvest. It was common for families to eat tapioca for 3 meals a day, on its own or accompanied by simple dishes such as salted fish, porridge, or mixed with potatoes. It was not surprising to learn that many people suffered from malnutrition during the war.

By itself, tapioca is tasteless; but when steamed and eaten with sugar, it makes a nice snack. I must confess that tapioca hardly figures on my table, and I do not have a liking for it except in the form of this cake featured. I learned the recipe because it didn’t require much technique or skill; and Grandma would insist that I make the cake just to get me out of her hair whenever I became too much of a handful!


Steamed Tapioca Cake

Tapioca (木薯)        320 g, grated            
Sugar                           85 g                          
Egg                               1, lightly beaten
Coconut milk              180 ml, or can be substituted with milk              
Pandan juice               2 tbsp, optional
Salt                               a pinch

Method:
1.    Combine sugar, egg, coconut milk, pandan juice and salt, and stir the mixture until the sugar has melted.
2.     Add grated tapioca and mix thoroughly.
3.     Pour into a greased pan and steam for 45 minutes.
4.     Cool the cake completely before slicing it for serving.

Note:   The sliced cake can be coated with steamed grated coconut before serving. 
             Two versions are featured. The green one has pandan juice and milk, while the white cake uses just coconut milk.
             There is a baked version of this cake. It's called Kueh Bingkar Ubi in Malay.

Tuesday, 17 May 2011

My Encounter with Original Sweet & Sour Pork

Clinging to ghosts…sad, regretful, and looking to bring back the past…

Oh dear, do I sound like I’m describing myself?

Fortunately, no; instead I was remembering an old chef I once knew, and from whom, for a short while, I learned some of the finest techniques of Cantonese cooking when I was eleven.

Being a new immigrant to England, this chef had a hard time adjusting to his adopted land. As he was not able to speak any English, he hardly ventured out of the restaurant, or his home. His world consisted of work, sleep, meals and occasional chitchat with fellow chefs, and little else.

Though trained as a Cantonese chef and working in a Cantonese restaurant, he was called upon to make tremendous adjustments and “adaptations” to dishes he knew so well. As anyone who’s traveled to the west knows (and remember, this was the 1960s), “Cantonese” is never really Cantonese over there. All Cantonese food had been localized to suit the western palate; outside of China, there was no such thing as “authentic” Cantonese – something my chef friend quickly came to learn. And it made his woes worse.

Stuck in an alien society and a hard, unrelenting work cycle, he spent a lot of time lamenting his decision to leave home. When it became especially bad, he would cook some ethnic Cantonese dishes for himself, to take the edge off his homesickness. As I spent a chunk of my childhood hanging around the restaurant kitchen, I inevitably became his listening ear – and beneficiary of his “comfort” cooking. I also learned some recipes from him, and one of these was Sweet and Sour Pork.

Unlike the ones we’re familiar with, this recipe uses no tomato sauce at all, but instead, preserved plum sauce. Apparently, tomato sauce was introduced as a substitute by chefs in America and Britain, to an audience more familiar with the flavors of the tomato than the Chinese plum.

Also from him, I learned a version of Sweet and Sour Pork, authentic enough, and mean enough to actually help me through my college days! I would teach cooking in private homes to earn extra pocket money, and a very popular mainstay of my repertoire was western-style Sweet and Sour Pork which I adapted from his teachings.

Sadly, I never knew what became of my friend the chef…I never saw him again after I left the restaurant kitchen.


Original Sweet & Sour Pork
Pork  loin with some fat       200 g, cut into 2.5cm squares
Soy sauce                                  1 tsp
Oyster sauce                            ½ tbsp
Egg yolk                                     ½
Corn flour                                 ½ cup + 1 tbsp
Red chilli                                    1, sliced thickly
Green chilli                                2, sliced thickly

Sauce:
Preserved plum sauce          ¼ cup
Hawthorn (山楂)                      20 g, mashed
Salt                                              ¼ tsp


Method:
1.    Season the pork with soy sauce, oyster sauce, egg and 1 tbsp. of corn flour for at least 30 minutes. Add 1 cup of corn flour gradually, until the pork is well coated and has a crumbly texture.
2.    Deep-fry pork until slightly golden. Remove and drain the oil completely.
3.    Once the pork has cooled sufficiently, deep-fry the pork again until it is golden brown. This step ensures the pork stays crispy. Remove pork and drain completely.
4.    Mix the ingredients for the sauce thoroughly.
5.    Heat the wok and quick-stir-fry chillies for 1 minute.
6.    Pour the mixture and stir thoroughly. Add pork and fry for another 30 seconds, or until the sauce coats the pork and chillies thoroughly. There shouldn’t be any sauce left at the bottom of the wok.
7.    Remove and serve immediately.


Note: Hawthorn gives a slightly sourish taste and a reddish tinge to the dish.
            A hallmark of a good sweet and sour dish is a strong contrast of sweetness from the plum sauce, and sourness from hawthorn.

Monday, 9 May 2011

Before There Was Instant Noodle

It may be hard to believe…but there was a time when instant noodles didn’t exist. And when one wanted a quick snack, one had to scoot down to a nearby coffee shop for a fish ball noodle or kaya toast.

In those days (I think instant noodles appeared sometime early-70s), the equivalent of instant noodles was the dried cakes of noodles sold by the shops making fresh noodles and wonton skins (see my previous post). You’d see these noodle cakes displayed in huge glass containers lining the wall of the shop, and they’d be sold by the cake or by weight.

Every household had a few of these dried noodle cakes in the larder. There were different flavors – plain, egg, dried scallop, and more. I remember even having them for breakfast, made into fried noodles by hawkers.

Unlike instant noodles, the cake noodles were not fried and didn’t come with little sachets of soup flavoring and seasoning – but were packed with flavor nonetheless. That’s because the noodle itself contained ingredients such as egg, prawn, or abalone. And what it didn’t contain was msg, so it tasted of the natural ingredients and not of artificiality.

All you actually needed, to go with these noodles, was a good home-made broth, or, as I would do, a home-made oyster sauce, sesame oil, vegetables, and chilli – tossed and eaten neat.

Yes, I make my own oyster sauce, and the recipe is below. I find that it tastes worlds apart from any off-the-shelf equivalent, and totally transforms any dish it is used with.

So here’s to eating minimalist-ically….but incredibly well!

  
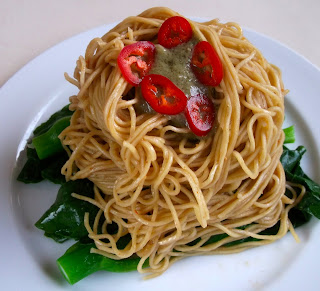
Noodle with Home-made Oyster Sauce

Water                                      2 litres
Egg noodle                            90 g
Oyster sauce                          1 tbsp
Soy sauce                              1 tsp
Chilli sauce                            1 tbsp (optional)
Oil                                           ½ tbsp.
Vegetable                               50 g
Sesame oil                             a dash
White pepper                                   


Home-made Oyster Sauce
Fresh oysters                         500 g
Corn flour                               2 tbsp
Garlic                                      4 cloves, minced
Ginger                                    15 g, minced
Shallots                                  6, minced
Oil                                           ½ cup
Salt                                         2 tsp
Sugar                                      1 tsp

Method:
Oyster sauce
 1.      Mix corn flour and oysters thoroughly. Rinse with water until clean. The corn flour helps to remove impurities in the oyster.
 2.      Heat oil under low flame. Add garlic, ginger and shallots and continue to cook under low flame until it turns slightly golden.
3.      Remove the garlic, ginger and shallots and blend them with the oyster until smooth.
4.     Return the oyster mixture to the infused oil and continue to cook. Initially, there will be a lot of foam in the oil. Continue to cook in medium heat until the foam subsides.
5.     Cook the mixture for another 30 minutes.
6.     Turn off the heat and let the oyster sauce cool.
7.      Pour into a bottle and chill it.
8.      The oyster sauce must be eaten within 2 weeks.

To assemble:
1.    Cook vegetables in boiling water. Remove the vegetables and drain completely. Place the vegetables on a serving plate.
2.    Place the noodles into boiling water and cook them until al dente. Rinse the noodles in cold water to give it a crunchy texture. Return noodles to the boiling water and cook for another 30 seconds.
3.    Meanwhile, mix the oyster, soy, and chilli sauces thoroughly in a bowl. Toss noodles with the sauce and place the noodles on top of the vegetable.
4.    Drizzle sesame oil and white pepper and serve immediately.